The ReadyOp dispatch/radios facilitates secure communications between radios channels as well as dashboard to dashboard, it makes it easy to access and reach people within your organization when they’ve logged in through the ReadyOp system as well as when they are connected via land mobile radio systems (for more information on connecting to land mobile radios, see the AudioMate 360).
Creating a Radio
- Start by opening the Radios/Dispatch tab.
- This tab may not be present if you have not been granted access to manage radios.
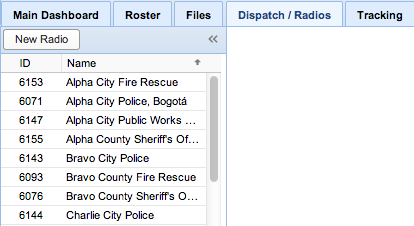
- Click “New Radio” in the upper-left corner of the dispatch tab to bring up the new radio dialog.
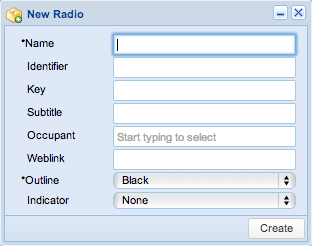
- In the new radio dialog enter the desired details for your new radio and press “Create” to save the new radio.
- Creating a radio will make it by default available only to Super Administrators. You can add permission to access the radio channel by modifying the radio after it has been created.
| Field | Explanation |
| Name | The name of the radio as you’d like it to appear on the radio itself and in the list of available radios |
| Identifier | Used similarly to a username, this allows you to configure an AM360 to authenticate and connect to the radio channel. |
| Key | Similar to a password, this allows you to configure an AM360 to authenticate and connect to the radio channel. |
Deleting a Radio
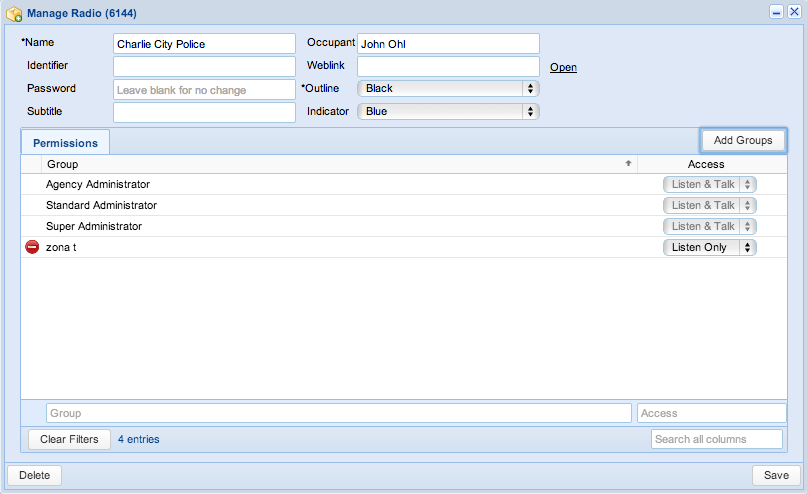
- Start by either double clicking the radio you’d like to delete from the list of existing radios on the left side of the dispatch tab or by clicking on the underlined name of the object on one of the active radios.
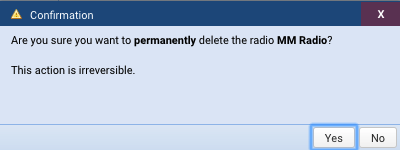
- In the Manage Radio dialog, click the “Delete” button to delete the radio. You’ll then be prompted with a confirmation dialog for which you’ll have to confirm you want to permanently delete the radio channel.
- When a radio is deleted it is removed for all users.
Showing a Radio
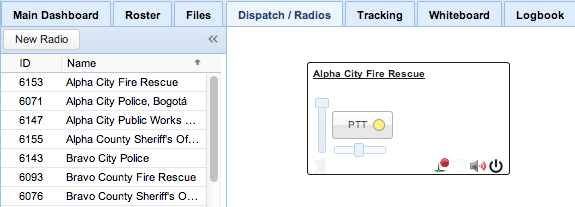
- Drag and drop the radio from the list of radios in the left pane into the dispatch tab’s active radio space.
- Showing a radio only applies to your particular user profile and does not affect other users.
Hiding a Radio
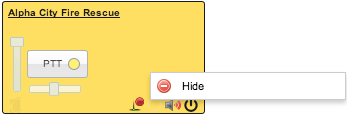
- Right click the radio you’d like to hide and select the “Hide” option.
- In addition, you can select multiple radios by dragging a box in the active dispatch area around the radio objects you’d like to hide, or by holding the CTRL (for Windows) or Command ⌘ (for OSX) key and clicking the radios you’d like to select.
- Hiding a radio only applies to your particular user profile and does not affect other users.
Making a Radio Active or Inactive
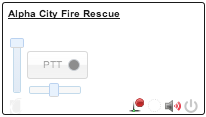
- To activate/deactivate a radio press the power symbol
 in the bottom right corner of the radio. This will toggle the radio channel between active or inactive.
- Radios that are inactive will not have history automatically appear in the history pane, and you will not see any indications of audio transmissions until activated.
- This only applies to your particular user profile and does not affect other users.
Volume
![]() The volume bar is located on the left side of the PTT button in a vertical direction of the radio box. It can be adjusted for higher or lower to change the volume of audio in the radio channel. This only applies to your user profile and does not affect other users.
The volume bar is located on the left side of the PTT button in a vertical direction of the radio box. It can be adjusted for higher or lower to change the volume of audio in the radio channel. This only applies to your user profile and does not affect other users.
Balance
![]() The balance bar is located under the PTT button in a horizontal direction of the radio box. It is used to move the audio further to either the left or right speaker. For example, you could adjust one channel all the way to the left speaker, and one all the way to the right speaker and audio from one channel would only play out the left speaker and audio from the other would only play out the right speaker. This only applies to your user profile and does not affect other users.
The balance bar is located under the PTT button in a horizontal direction of the radio box. It is used to move the audio further to either the left or right speaker. For example, you could adjust one channel all the way to the left speaker, and one all the way to the right speaker and audio from one channel would only play out the left speaker and audio from the other would only play out the right speaker. This only applies to your user profile and does not affect other users.
Mute/Unmute
![]() Clicking the mute icon in the bottom right corner of a radio channel will allow you to toggle the radio channel between muted and un-muted. While muted, audio will not be transmitted to your client, however, real time history information as well as visual indications of channel traffic will still appear.
Clicking the mute icon in the bottom right corner of a radio channel will allow you to toggle the radio channel between muted and un-muted. While muted, audio will not be transmitted to your client, however, real time history information as well as visual indications of channel traffic will still appear.
Status Indicator
![]() The status indicator allows you to easily check whether or not a radio gateway (AM360) is connected (if a radio gateway has been configured for the channel). It will show a red network indicator icon if the gateway is not currently connected to the system and a green network indicator icon if the gateway is currently connected.
The status indicator allows you to easily check whether or not a radio gateway (AM360) is connected (if a radio gateway has been configured for the channel). It will show a red network indicator icon if the gateway is not currently connected to the system and a green network indicator icon if the gateway is currently connected.
Permissions
Channel permissions allows you to define which user groups or roles permission to view, listen only or listen and talk on various radio channels. By default when a channel is created only the Super Administrator has access to view as well as listen and talk on the channel.
Granting Permission
The default group cannot be deleted or modified. If your user profile permits access, you will be able to manage which groups can view, listen only or listen and talk on a particular channel.
Inside the dispatch tab;
- If the radio hasn’t been dragged from the dispatch list to the dispatch/radios dashboard. Double click the radio you’d like to change the permissions for from the existing list of radios.
- If the radio is on the dispatch/radios dashboard. Left-click on the radio’s underlined name to open it.
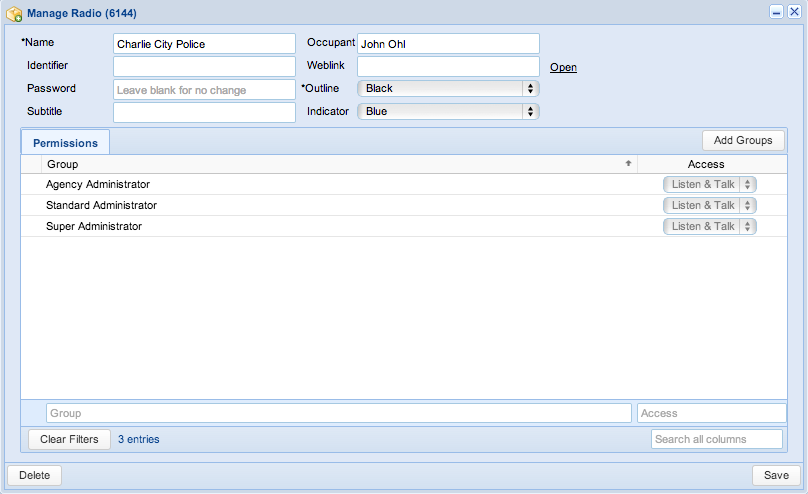
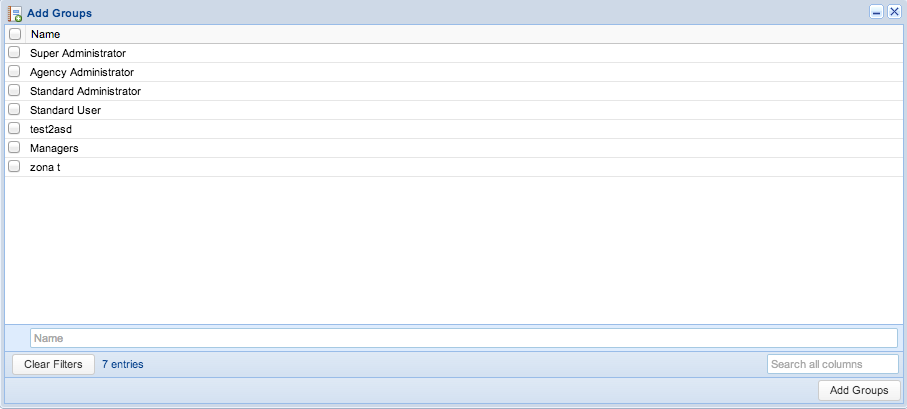
- Inside the Manage Radio dialog, select “Add Groups” to bring up the Add Groups dialog.
- Select the group(s) you’d like to add by marking the checkbox next to their name.
- Click the “Add Groups” button, to add the selected group(s).
- By default groups are added with the listen only permission.
- To allow users in a particular group to talk on the radio channel, you’ll need to change the access level using the picker in the permissions list.
- If a group has not been added to the list, the radio will not be visible or even appear to exist for users in those groups.
Revoking Permission
The default group cannot be modified. If your user profile permits access, you will be able to manage which groups can view, listen or listen and talk on a particular channel.
- Inside the dispatch tab;
- If the radio hasn’t been dragged from the dispatch list to the dispatch/radios dashboard. Double click the radio you’d like to change the permissions for from the existing list of radios.
- If the radio is on the dispatch/radios dashboard. Left-click on the radio’s underlined name to open it.
- In the Manage Radio dialog, left-click the “delete” icon next to the group to remove access for the group.
- To simply restrict access to listen only instead of removing access for a group you can use the picker in the permissions list.
- To save your changes, press “Save”.
- Changing a groups access may require the users in the group to logout and log back in before the change takes effect.
