Placing a Call
- In order to start a call you’ll need start by identifying the person(s) you’d like to be connected to. These can be either person’s in an object, or person’s in the roster.
- Calls can be placed to both contacts that exist in the roster, as well as manually added numbers.
Selecting contacts by object or object(s)
- Start by selecting one or more objects on the dashboard.
- This can be accomplished by dragging a box from outside the objects, around the objects you’d like to select.
- In addition, objects can be selected by holding the CTRL key (Windows), or the ⌘ Command key (Mac), and clicking in the whitespace of the objects you’d like to select.
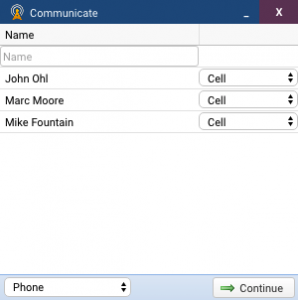
- Once selected click on any of the contact icons inside the objects to open the communicate dialog.
Selecting contacts inside Objects (Agencies, Roles / Teams)
- Start by clicking on an object’s title to open the “Manage Object” dialog.
- Inside this dialog, on the “People” tab you’ll see all the people that belong to the given Agency / Role / Team. Select the person(s) you’d like to contact by clicking the checkboxes next to their contact options.
- Once selected, click any of the contact icons inside the objects to open the communicate dialog.
Selecting contacts through the Roster
- Open the “Roster” tab to begin selecting people from the roster.
- If you cannot find the roster tab, it’s possible the tab has been renamed or you do not have permission to access it, contact your Administrator for more information on how to find the Roster tab in your dashboard.
- Here you can search for persons based on the given contact fields, you can select people by clicking the checkboxes next to their contact option icons.
- Once selected, click any of the contact icons inside the objects to open the communicate dialog.
Starting the Call
- After you’ve selected the person(s) you’d like to contact and have the communicate dialog open. Select the “Phone” option from the communication type picker in the bottom left corner. When you’re ready to continue, click the “Continue” button in the bottom right corner.
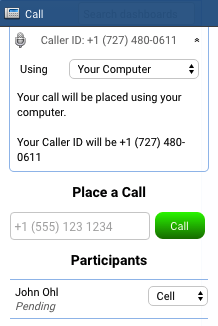
- You’ll then be presented with following “Call” dialog.

Screenshot: Start Call - Inside this new dialog it’s possible to continue adding more contacts to be connected. You can drag and drop contacts from the following locations into this dialog;
- Search -> Tasks/Assets dialog.
- From inside a “Manage Object” dialog.
- You can drag objects themselves to add their primary occupant to the list.
- From the roster.
- It is possible to manually specify a phone number of a person you’d like to be connected with by typing their number into the Place a call input box.
- If you’d like to remove a person from the list of recipients, simply drag and drop their name from the list of recipients outside of the Call dialog.
- Inside this new dialog it’s possible to continue adding more contacts to be connected. You can drag and drop contacts from the following locations into this dialog;
- Click on the Caller ID number at the top of the Call dialog to configure your telephony options. This allows you, as the host of the call, to specify how you would like to be connected. Available options are as follows;
- My Computer
- Also known as the Softphone. This connects you into the call via your computer. You’ll need to have configured a microphone in order for the participants to hear you once they have been connected. For more information on configuring a your microphone, see Communication Settings.
- Cell
- Connect via your cell phone as setup in your User Profile. This option is unavailable if you have not yet configured your cell phone in your User Profile.
- Desk
- Connect via your desk phone as setup in your User Profile. This option is unavailable if you have not yet configured your your phone in your User Profile.
- My Computer
- After you have chosen the method in which you would like to be connected press the green Call button to begin the call/conference.
- If you chose to be connected via the “My Computer” option, you should automatically be connected, and the recipients will be dialed automatically. If you chose to be connected via either your cell or desk phone you should receive a phone call to your physical phone/device. Once you answer your phone (either cell or desk) the participants will then be called automatically.
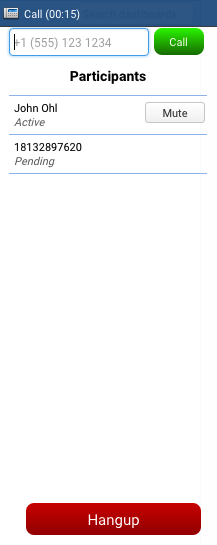
- As each participant answers the call they will automatically be bridged into the call/conference. Their status in the “Call” dialog will be updated automatically as “Active” and you should hear an audible tone indicating a participant has joined.
Adding Participants
Once a call has started, contacts can be added by the following methods:
Adding contacts by object or object(s)
- Start by selecting one or more objects on the dashboard.
- This can be accomplished by dragging a box from outside the objects, around the objects you’d like to select.
- In addition, objects can be selected by holding the CTRL key (Windows), or the ⌘ Command key (Mac), and clicking in the whitespace of the objects you’d like to select.
- Once selected drag and drop them into the active call dialog.
Adding contacts inside Objects (Agencies, Roles / Teams)
- Start by clicking on an object’s title to open the “Manage Object” dialog.
- Inside this dialog, on the “People” tab you’ll see all the people that belong to the given Agency / Role / Team. Select the person(s) you’d like to contact by clicking the checkboxes next to their contact options.
- Once selected drag and drop them into the active call dialog.
Adding contacts through the Roster
- Open the “Roster” tab to begin selecting people from the roster.
- If you cannot find the roster tab, it’s possible the tab has been renamed or you do not have permission to access it, contact your Administrator for more information on how to find the Roster tab in your dashboard.
- Here you can search for persons based on the given contact fields, you can select people by clicking the checkboxes next to their contact option icons.
- Once selected drag and drop them into the active call dialog.
Adding contacts manually by name
The first row in the participants list of the communicate dialog contains a field that allows you to lookup a contact by name. Simply type the name of the contact you’d like to add and when the autocomplete drop down appears, click the contact’s name to add them to the call.
Adding recipients manually by number
The first row of the participants list in the active call dialog contains a field that allows you to directly input the phone number of someone you’d like to call. Simply type the number in the “Place a Call” input box and press the call button to add the recipient to the call.
Disconnecting Participants
To disconnect a participant simply drag and drop the participant from the active call participant list outside of the dialog, they will be automatically disconnected.
Muting/Unmuting Participants
During an active call, you’ll be provided with the options for both muting and unmuting an active participant.


